Quickstart
Welcome to the world of KubeFox! This technical guide will walk you through the process of setting up a Kubernetes cluster using either kind or Azure and deploying your inaugural KubeFox app. From crafting environments and deploying apps to testing and version control, we'll cover it all. Whether you're a seasoned developer or just getting started, this guide will help you navigate the fundamentals of a comprehensive software development lifecycle leveraging KubeFox. Let's dive in!
Prerequisites
Ensure that the following tools are installed for this exercise (each of the keywords below contains a link to the installation web page for the referenced product):
- Docker Desktop - The easiest way to get going with Docker is to install Docker Desktop. Docker is a container toolset and runtime used to build KubeFox Component OCI images and run a local Kubernetes Cluster via kind. Click the link corresponding to the OS you wish you use.
- Fox - A CLI for communicating with the KubeFox Platform.
- Git - A distributed version control system. If this is the first time you're installing git, go through the steps to ensure that your identity is established (see "Your Identity" on the next page).
- Helm - Package manager for Kubernetes used to install the KubeFox Operator on Kubernetes.
- kind - kind is Kuberentes in Docker. kind is a tool for running local Kubernetes Clusters using Docker container "nodes", hence Docker must be running before you use kind to create your Kubernetes cluster.
- Kubectl - CLI for communicating with a Kubernetes Cluster's control plane, using the Kubernetes API.
Here are a few optional but recommended tools:
- Go - A programming language. The
hello-worldexample App is written in Go, but Fox is able to compile it even without Go installed. - VS Code - A lightweight but powerful
source code editor. Helpful if you want to explore the
hello-worldapp. - Azure CLI - CLI for communicating with the Azure control plane.
- k9s - A terminal based UI to interact with your Kubernetes clusters. You can use native kubectl commands to accomplish the same things, but k9s is a nice convenience and we use it here. By the way, the k9s homepage is probably the cleverest of any company in the k8s space, succeeding in that endeavor at many levels.
Tracing
You can choose to run the Quickstart with tracing active, or without tracing. With tracing active, a couple of additional Pods are created:
- A Pod for OpenTelemetry which collects and exports trace data to Jaeger
- A Pod for Jaeger providing a visual interface for trace data
Tracing enables you to trace the workflow of your application - which components call which components, how much time was spent in each component etc.
If this is the first time you've worked with Kubernetes or KubeFox, perhaps skip tracing for now just to keep things simple. But if you're feeling adventurous or curious, feel free to proceed with Tracing Active.
By the way, once you select Tracing Active or No Tracing, or whether you're going to use Local(kind) or Azure (below), it remains selected throughout the document so you can select-and-forget.
Setup Kubernetes
Let's kick things off by setting up a Kubernetes cluster. Use the following commands depending on which Kubernetes provider you would like to use. If you already have a Kubernetes Cluster provisioned, you can skip this step.
Setup a Kubernetes cluster on your workstation using kind and Docker. Kind is an excellent tool specifically designed for quickly establishing a cluster for testing purposes.
Output
    Creating cluster "kind" ...
    ✓ Ensuring node image (kindest/node:v1.27.3) 🖼
    ✓ Preparing nodes 📦
    ✓ Writing configuration 📜
    ✓ Starting control-plane 🕹️
    ✓ Installing CNI 🔌
    ✓ Installing StorageClass 💾
    ✓ Waiting ≤ 5m0s for control-plane = Ready ⏳
    • Ready after 15s 💚
    Set kubectl context to "kind-kind"
    You can now use your cluster with:

    kubectl cluster-info --context kind-kind

    Have a nice day! 👋
Establish a remote Kubernetes cluster on the Microsoft Azure cloud platform using the Azure CLI. Keep in mind that creating the specified resources may result in costs. Instructions at the end of the quickstart will guide you in tearing down all the created resources.
Next set the required variables for this quickstart on Azure.export AZ_LOCATION=eastus2 && \
export AZ_RESOURCE_GROUP=kf-quickstart-infra-eus2-rg && \
export AZ_AKS_NAME=kf-quickstart-eus2-aks-01
Now you will create a Resource Group for the AKS cluster, and then deploy Azure Kubernetes Service (AKS) to the group. The cluster provisioning will take several minutes to complete.
az group create --location $AZ_LOCATION --name $AZ_RESOURCE_GROUP && \
  az aks create \
    --resource-group $AZ_RESOURCE_GROUP \
    --tier free \
    --name $AZ_AKS_NAME \
    --location $AZ_LOCATION \
    --generate-ssh-keys \
    --node-count 1 \
    --node-vm-size "Standard_B2s"
Output
{
  "id": "/subscriptions/00000000-0000-0000-0000-00000000/resourceGroups/kf-quickstart-infra-eus2-rg",
  "location": "eastus2",
  "managedBy": null,
  "name": "kf-quickstart-infra-eus2-rg",
  "properties": {
    "provisioningState": "Succeeded"
  },
  "tags": null,
  "type": "Microsoft.Resources/resourceGroups"
}

(... and much more ...)
Once your AKS cluster is ready add the cluster to your kubectl configuration to securely communicate with the Kube API.
A different object named ... already exists in your kubeconfig file messages
If you see messages like these, you've probably run the Quickstart on Azure previously. Just answer "y" to overwrite as shown below.
A different object named kf-quickstart-eus2-aks-01 already exists in your kubeconfig file.
Overwrite? (y/n): y

A different object named clusterUser_kf-quickstart-infra-eus2-rg_kf-quickstart-eus2-aks-01 already exists in your kubeconfig file. Overwrite? (y/n): y

Merged "kf-quickstart-eus2-aks-01" as current context in /Users/Steven/.kube/config
The last resource to create is the Azure Container Registry (ACR). This is used to store the KubeFox Component container images.
export AZ_ACR_NAME="acr$RANDOM" && \
  az acr create --name $AZ_ACR_NAME --sku Basic --admin-enabled true --resource-group $AZ_RESOURCE_GROUP
export FOX_REGISTRY_ADDRESS=$(az acr show-endpoints \
    --name $AZ_ACR_NAME \
    --resource-group $AZ_RESOURCE_GROUP \
    --output tsv \
    --query loginServer) && \
  export FOX_REGISTRY_TOKEN=$(az acr login \
    --name $AZ_ACR_NAME \
    --expose-token \
    --output tsv \
    --query accessToken) && \
  export FOX_REGISTRY_USERNAME="00000000-0000-0000-0000-000000000000"
Setup KubeFox
In this step you will install the KubeFox Helm Chart to initiate the KubeFox Operator on your Kubernetes cluster. The operator manages KubeFox Platforms and Apps.
If you're using a Mac, we need to load the correct version of KubeFox for your processor type (Intel or Mac). If you're uncertain of how to determine what processor you're running, expand the "Mac Processor Determination" section below.
Mac Processor Determination
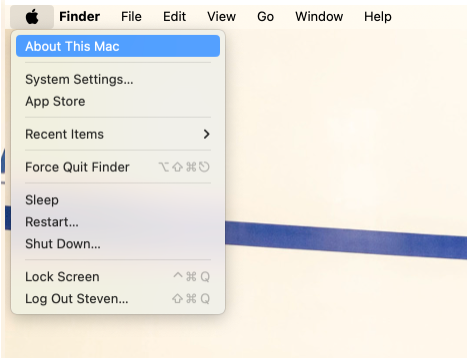
Click the Apple icon at the top left of any window and select "About this Mac".
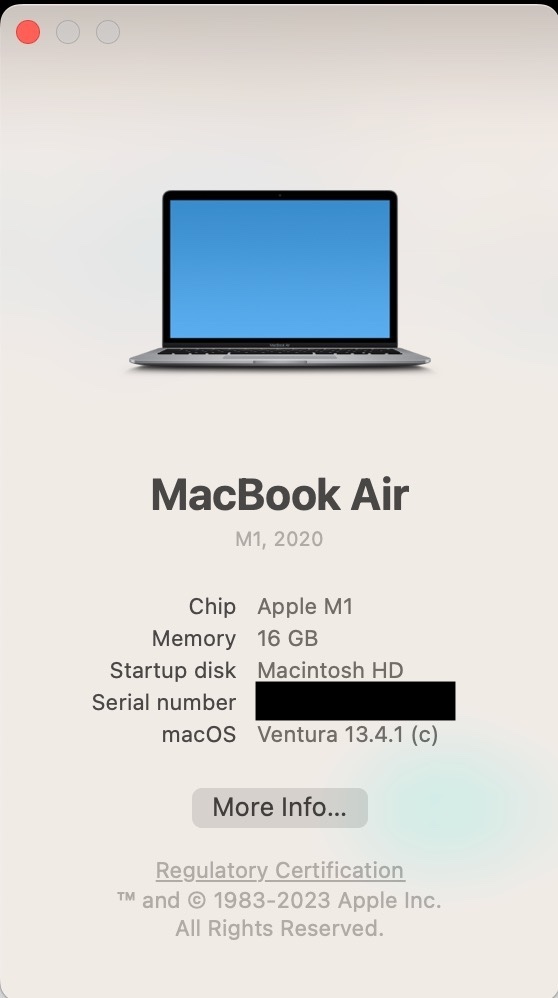
This is an example of the output if you're running Apple silicon (an "M" processor):
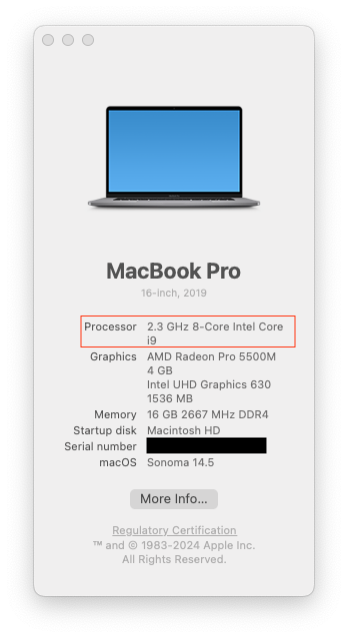
And this is an example of the output if you're running an Intel processor:
If (and only if) you're running a Mac with Apple silicon (M1, M2 or M3), select the "Apple Silicon" tab. Otherwise, select the "Not Apple Silicon" tab.
Install KubeFox on local kind cluster with tracing active.
Install KubeFox on local kind cluster (on Apple silicon) with tracing active.
Install KubeFox on Azure with tracing active.
Deploy
Awesome! You're all set to start the KubeFox Platform on the your newly created
cluster and deploy your first KubeFox App. To begin, create a new directory and
use Fox to initialize the hello-world App. Run all subsequent commands from
this directory. The environment variable FOX_INFO tells Fox to to provide
additional output about what is going on. Employ the --quickstart flag to use
defaults and create a KubeFox Platform named demo in the kubefox-demo
Namespace.
mkdir kubefox-quickstart && \
  cd kubefox-quickstart && \
  export FOX_INFO=true && \
  fox init --quickstart
Output
Notice the newly created directories and files. The hello-world App comprises
two Components, frontend and backend. There are also two example
Environments and Virtual Environments in the hack/environments directory.
Finally, Fox initialized a new Git repo for you. Take a look around!
Now, let's create some Environments and Virtual Environments. A Virtual
Environments inherits all specifications and data from its parent Environment,
but values can be overridden or added in the Virtual Environments. In the
provided examples the subPath variable is used to ensure unique routes between
Virtual Environments.
Run the following command to examine the Environments and Virtual Environments
and apply them to Kubernetes using kubectl. Note the differences between the
two Environments' variables on the highlighted lines.
Output
---
apiVersion: kubefox.xigxog.io/v1alpha1
kind: Environment
metadata:
  name: prod
spec:
  releasePolicy:
    type: Stable
data:
  vars:
    who: Universe
    subPath: prod
---
apiVersion: kubefox.xigxog.io/v1alpha1
kind: VirtualEnvironment
metadata:
  name: prod
spec:
  environment: prod
---
apiVersion: kubefox.xigxog.io/v1alpha1
kind: Environment
metadata:
  name: qa
spec:
  releasePolicy:
    type: Testing
data:
  vars:
    who: World
    subPath: qa
---
apiVersion: kubefox.xigxog.io/v1alpha1
kind: VirtualEnvironment
metadata:
  name: qa
spec:
  environment: qa
environment.kubefox.xigxog.io/prod created
virtualenvironment.kubefox.xigxog.io/prod created
environment.kubefox.xigxog.io/qa created
virtualenvironment.kubefox.xigxog.io/qa created
We have two Virtual Environments:
- prod - which inherits an environment variable 'who' set to “Universe” and a subpath of “prod” from its parent Environment.
- qa - which inherits an environment variable 'who' set to "World" and a subpath of “qa” from its parent Environment.
Next deploy the hello-world App. Simply use the publish command, which not
only builds the OCI images for the Components but also pushes them to the
container registry and finally deploys the App to the KubeFox Platform. You have
the flexibility to specify the name and version of the AppDeployment you're
creating. We'll delve into AppDeployment version later in this tutorial, so
there's no need to worry about it right now. If you don't provide a name,
KubeFox defaults it to <APP NAME>-<GIT REF>. In our case, it becomes
hello-world-main. The initial run might take a bit of time as it downloads
dependencies, but subsequent runs will be faster. If you want more detailed
feedback, consider adding the --verbose flag.
Output
info    Building Component image 'localhost/kubefox/hello-world/backend:3fbfcb274c2116d4d82271da41074135'.
info    Loading Component image 'localhost/kubefox/hello-world/backend:3fbfcb274c2116d4d82271da41074135' into kind cluster 'kind'.

info    Building Component image 'localhost/kubefox/hello-world/frontend:98c75bd20b210d15b456ec92faab2abd'.
info    Loading Component image 'localhost/kubefox/hello-world/frontend:98c75bd20b210d15b456ec92faab2abd' into kind cluster 'kind'.

info    Waiting for KubeFox Platform 'demo' to be ready.
info    Waiting for Component 'backend' to be ready.
info    Waiting for Component 'frontend' to be ready.

apiVersion: kubefox.xigxog.io/v1alpha1
kind: AppDeployment
metadata:
  creationTimestamp: "1970-01-01T00:00:00Z"
  finalizers:
  - kubefox.xigxog.io/release-protection
  generation: 1
  labels:
    app.kubernetes.io/name: hello-world
    kubefox.xigxog.io/app-branch: main
    kubefox.xigxog.io/app-commit: 8bdd108ba636353020b95b75764b5edb18d5f914
    kubefox.xigxog.io/app-commit-short: 8bdd108
  name: hello-world-main
  namespace: kubefox-demo
  resourceVersion: "13326"
  uid: 5ad9a257-01c0-43e0-b6be-92757a47ba7c
details:
  description: A simple App demonstrating the use of KubeFox.
  title: Hello World
spec:
  appName: hello-world
  branch: main
  commit: 8bdd108ba636353020b95b75764b5edb18d5f914
  commitTime: "1970-01-01T00:00:00Z"
  components:
    backend:
      defaultHandler: true
      envVarSchema:
        who:
          required: true
      hash: 3fbfcb274c2116d4d82271da41074135
      type: KubeFox
    frontend:
      dependencies:
        backend:
          type: KubeFox
      hash: 98c75bd20b210d15b456ec92faab2abd
      routes:
      - envVarSchema:
          subPath:
            required: true
        id: 0
        rule: Path(`/{{.Vars.subPath}}/hello`)
      type: KubeFox
  containerRegistry: localhost/kubefox
status:
  conditions:
  - lastTransitionTime: "1970-01-01T00:00:00Z"
    message: Component Deployments have minimum required Pods available.
    observedGeneration: 1
    reason: ComponentsAvailable
    status: "True"
    type: Available
  - lastTransitionTime: "1970-01-01T00:00:00Z"
    message: Component Deployments completed successfully.
    observedGeneration: 1
    reason: ComponentsDeployed
    status: "False"
    type: Progressing
Inspect what's running on Kubernetes.
Output
The Pods for two Components you deployed were created, backend and frontend.
The broker, httpsrv, and nats Pods are part of the KubeFox Platform
initiated by the Operator during Platform creation.
Typically, connections to KubeFox Apps are made through a public-facing load balancer. To keep things simple for purposes of this tutorial, we'll use the Fox CLI to create a local proxy instead. Note that we're going to leave the proxy running, so it's important to start it in a new terminal window.
In the new terminal window run the following command:
macOS Network Warning
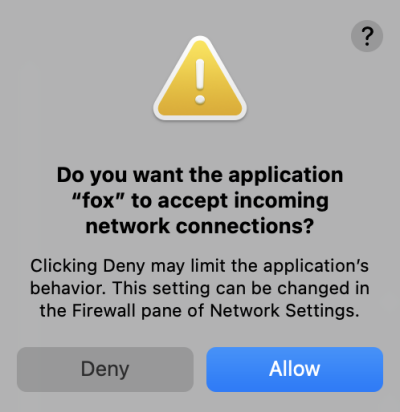
If you are using macOS you might notice this dialog popup when you start the
proxy. This is expected as Fox starts a local HTTP server. The server is
bound to the localhost interface and is only accessible from your
workstation. Please press Allow to continue.
KubeFox has the ability to generate trace data automatically. To see the traces, we need to do a couple of simple things. First, we need to set up port forwarding to enable a browser window to access the trace data we'll generate. As with the proxy, this will be a command we will leave running so we need another (a third) terminal window.
In the new terminal window, enter the following command:
With the port forward active, we can take a quick look at the Jaeger UI. Jaeger provides us the ability to visualize the traces generated by KubeFox. Click on the link and you should see a screen similar to that in Figure 1.
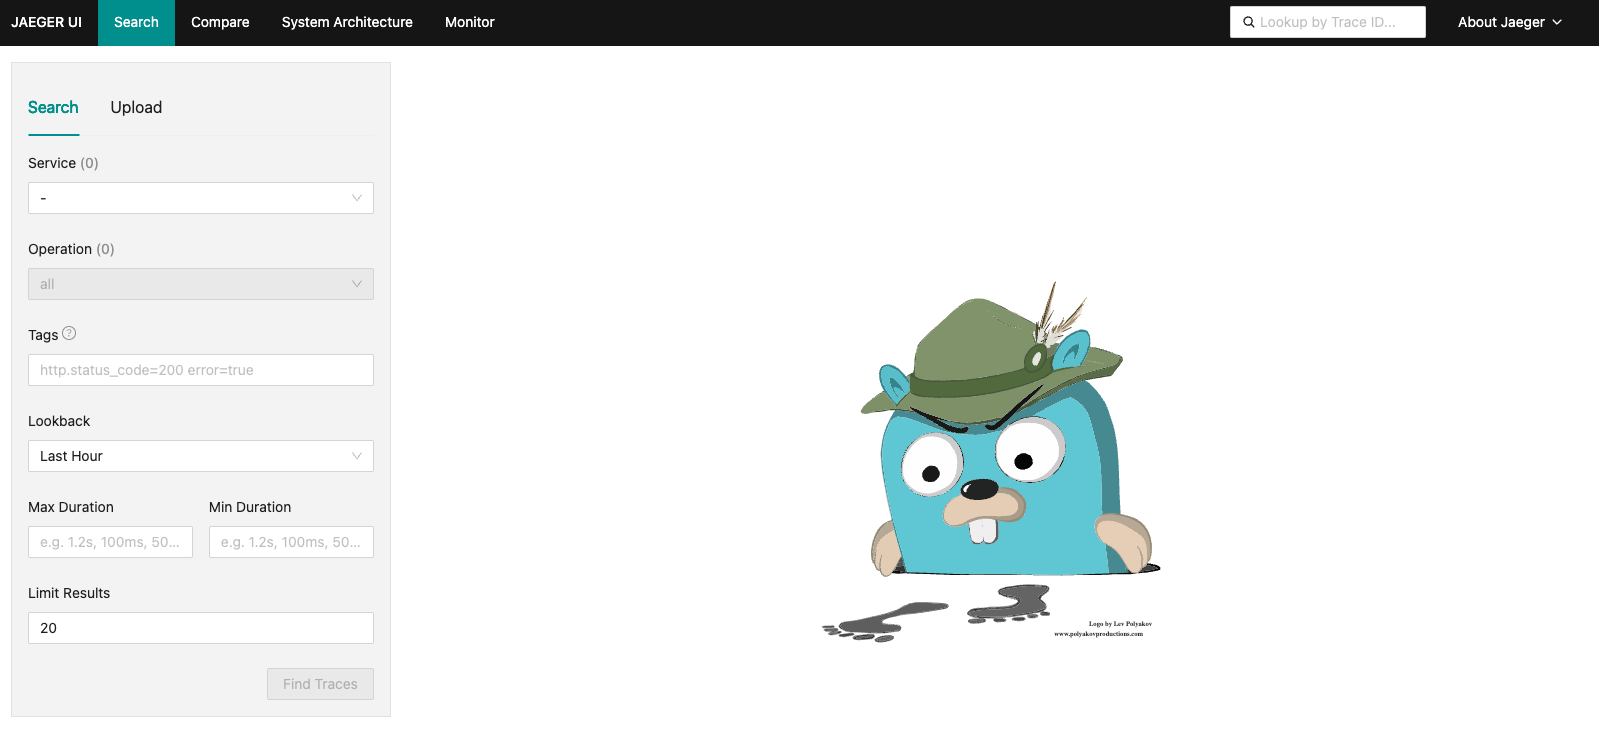
Note that we don't have any traces at this point because we haven't yet exercised our application. We'll jump back over to Jaeger in a moment.
Leave the port forward and the proxy running, and return to the original terminal. Back in the original terminal, let's test the AppDeployment. KubeFox won't route requests to the App until it's released, but you can still test AppDeployments by manually providing context. KubeFox needs two pieces of information to route an event, the AppDeployment to use and the Virtual Environments to inject. These can be passed as headers or query parameters for HTTP requests.
The query parameters are:
- kf-dep - specifies the deployment we want to target
- kv-ve - specifies a Virtual Environment in which the target deployment is available
- kf-sample=true - tells KubeFox that we want to generate trace data for a request
Let's run our first curl request!
Leave the proxy running, and return to the original terminal. Back in the original terminal, let's test the AppDeployment. KubeFox won't route requests to the App until it's released, but you can still test AppDeployments by manually providing context. KubeFox needs two pieces of information to route an event, the AppDeployment to use and the Virtual Environments to inject. These can be passed as headers or query parameters for HTTP requests.
The query parameters are:
- kf-dep - specifies the deployment we want to target
- kv-ve - specifies a Virtual Environment in which the target deployment is available
Let's run our first curl request!
Try switching to the prod Virtual Environment — this can be done seamlessly
with KubeFox without creating another AppDeployment. This is possible because
KubeFox injects context at request time instead of at deployment. Adding Virtual
Environments has nearly zero overhead! We need to change the URL path from
/qa/hello to /prod/hello to match the subPath variable we specified in the
Environment.
Let's take a look at Jaeger at this point. Go to the tab you opened above and do the following:
- Refresh the page
- Select the "hello-world-frontend..." in the "Service" dropdown.
- Click the "Find Traces" button at the bottom.
You should see something similar to what is shown in Figure 2 below.
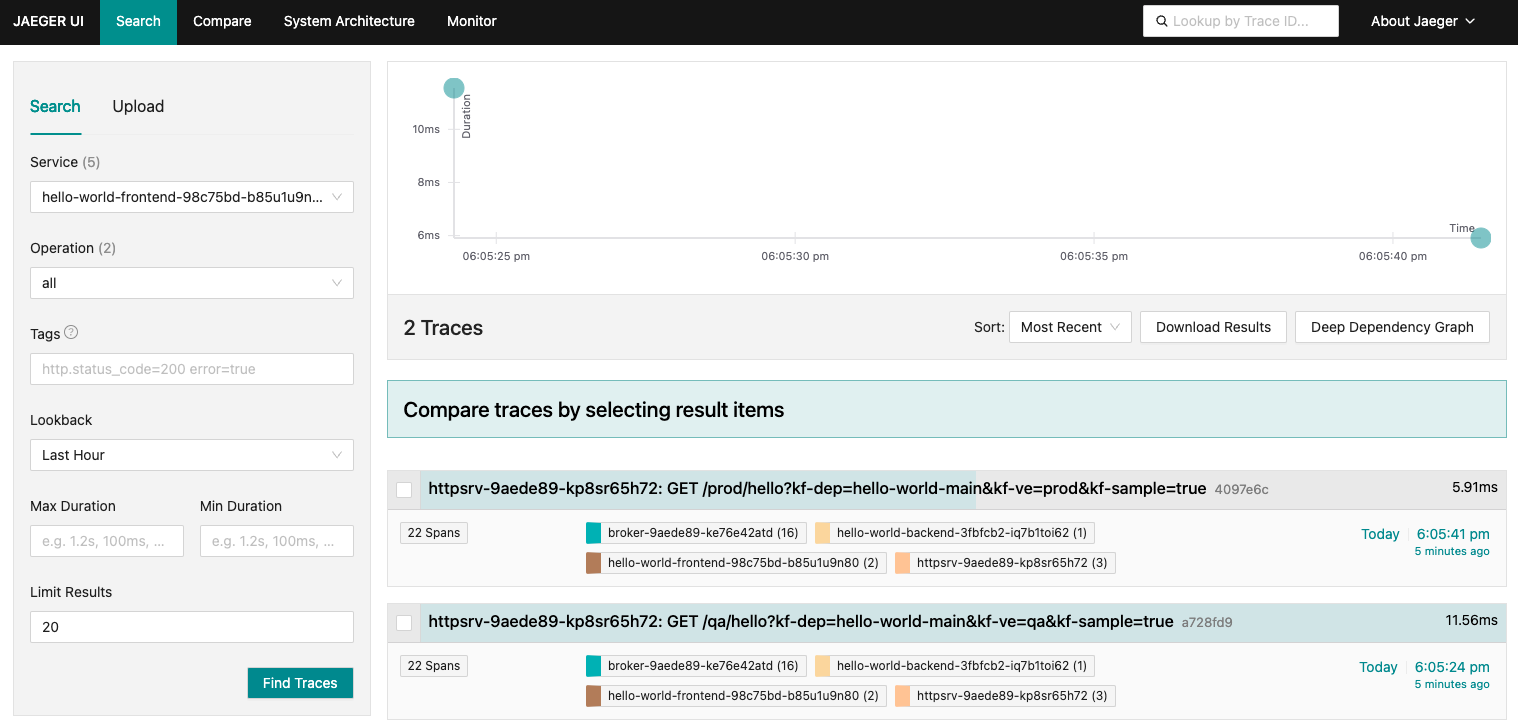
Pretty cool, right? With no time invested in the configuration of telemetry,
you're seeing trace data for the hello-world App, simply by virtue of building
the App with KubeFox.
Feel free to play around with Jaeger and get acquainted with the interface. Some pointers:
- Trace data will be available to Jaeger a few seconds after running a command.
- It is the 'kf-sample=true' query parameter that generates the trace data for a particular commmand.
- The simplest way to see data is to go through steps above (Refresh the Jaeger page, select the Service for which you want to see trace data, and click the "Find Traces" button).
Release
To have KubeFox automatically route requests without manually specifying context you need to create a Release. Once a AppDeployment is released, KubeFox will match requests to Components' routes and automatically inject context. Before creating a Release it is recommended to publish a versioned AppDeployment and tag the Git repo. Unlike normal AppDeployments, which can be updated freely, versioned AppDeployments are immutable. They provide a stable deployment that can be promoted to higher Virtual Environments.
Tag the Git repo, publish the versioned AppDeployment, and release it to the
qa Environment with this command.
Output
info    Component image 'localhost/kubefox/hello-world/backend:3fbfcb274c2116d4d82271da41074135' exists, skipping build.
info    Loading Component image 'localhost/kubefox/hello-world/backend:3fbfcb274c2116d4d82271da41074135' into kind cluster 'kind'.

info    Component image 'localhost/kubefox/hello-world/frontend:98c75bd20b210d15b456ec92faab2abd' exists, skipping build.
info    Loading Component image 'localhost/kubefox/hello-world/frontend:98c75bd20b210d15b456ec92faab2abd' into kind cluster 'kind'.

info    Creating tag 'v1'.

apiVersion: kubefox.xigxog.io/v1alpha1
kind: AppDeployment
metadata:
  creationTimestamp: "1970-01-01T00:00:00Z"
  finalizers:
  - kubefox.xigxog.io/release-protection
  generation: 1
  labels:
    app.kubernetes.io/name: hello-world
    kubefox.xigxog.io/app-branch: main
    kubefox.xigxog.io/app-commit: 8bdd108ba636353020b95b75764b5edb18d5f914
    kubefox.xigxog.io/app-commit-short: 8bdd108
    kubefox.xigxog.io/app-tag: v1
    kubefox.xigxog.io/app-version: v1
  name: hello-world-v1
  namespace: kubefox-demo
  resourceVersion: "2257050"
  uid: 782a0938-7f9d-4bae-a6b5-900499fca6f7
details:
  description: A simple App demonstrating the use of KubeFox.
  title: Hello World
spec:
  appName: hello-world
  branch: main
  commit: 8bdd108ba636353020b95b75764b5edb18d5f914
  commitTime: "1970-01-01T00:00:00Z"
  components:
    backend:
      defaultHandler: true
      envVarSchema:
        who:
          required: true
      hash: 3fbfcb274c2116d4d82271da41074135
      type: KubeFox
    frontend:
      dependencies:
        backend:
          type: KubeFox
      hash: 98c75bd20b210d15b456ec92faab2abd
      routes:
      - envVarSchema:
          subPath:
            required: true
        id: 0
        rule: Path(`/{{.Vars.subPath}}/hello`)
      type: KubeFox
  containerRegistry: localhost/kubefox
  tag: v1
  version: v1
status:
  conditions:
  - lastTransitionTime: "1970-01-01T00:00:00Z"
    message: Component Deployments have minimum required Pods available.
    observedGeneration: 1
    reason: ComponentsAvailable
    status: "True"
    type: Available
  - lastTransitionTime: "1970-01-01T00:00:00Z"
    message: Component Deployments completed successfully.
    observedGeneration: 1
    reason: ComponentsDeployed
    status: "False"
    type: Progressing

apiVersion: kubefox.xigxog.io/v1alpha1
kind: VirtualEnvironment
metadata:
  creationTimestamp: "1970-01-01T00:00:00Z"
  finalizers:
  - kubefox.xigxog.io/environment-protection
  generation: 2
  labels:
    kubefox.xigxog.io/environment: qa
  name: qa
  namespace: kubefox-demo
  resourceVersion: "5643"
  uid: f7d7a42f-bc3f-46f3-8ec4-c557e1a84fe3
spec:
  environment: qa
  release:
    apps:
      hello-world:
        appDeployment: hello-world-v1
        version: v1
status:
  activeRelease:
    activationTime: "1970-01-01T00:00:00Z"
    apps:
      hello-world:
        appDeployment: hello-world-v1
        version: v1
    id: 011aa5fd-0ed3-4920-8564-bb793435e97c
    requestTime: "1970-01-01T00:00:00Z"
  conditions:
  - lastTransitionTime: "1970-01-01T00:00:00Z"
    message: Release AppDeployments are available, Routes and Adapters are valid and
      compatible with the VirtualEnv.
    observedGeneration: 2
    reason: ContextAvailable
    status: "True"
    type: ActiveReleaseAvailable
  - lastTransitionTime: "1970-01-01T00:00:00Z"
    message: Release was activated.
    observedGeneration: 2
    reason: ReleaseActivated
    status: "False"
    type: ReleasePending
When a Fox Release is performed to a Virtual Environment, KubeFox will default
traffic to that subPath to the current release. In our case, traffic to
localhost:8080/qa/hello will be routed to the currently released version of the
hello-world App.
Test the same request as before, but this time without specifying context. Since the App has been released, the request is matched by the Component's route, and context information is automatically applied.
Inspect the Pods running on Kubernetes now that you created another AppDeployment and Release.
Output
Surprisingly, nothing has changed in the Pods running on Kubernetes. KubeFox dynamically injects context per request, just like when you changed Virtual Environments earlier with the query parameters.
AppDeployments are KubeFox custom resources, so you can get information on AppDeployments with Kubectl.
Output
Update
Next, let's make a modification to the frontend Component, commit the changes, and
deploy. Open up components/frontend/main.go in your favorite editor and update
line 28 in the sayHello function to say something new.
Update the sayHello function to say Hey instead of Hello, and save your changes. It should look
like this:
Fox operates against the current commit of the Git repo when deploying
Components. That means before deploying you need to commit the changes to record
them. You can then re-deploy the hello-world-main AppDeployment and test.
Output
[main 6dcc993] updated frontend to say Hey
1 file changed, 1 insertion(+)

info    Component image 'localhost/kubefox/hello-world/backend:3fbfcb274c2116d4d82271da41074135' exists, skipping build.
info    Loading Component image 'localhost/kubefox/hello-world/backend:3fbfcb274c2116d4d82271da41074135' into kind cluster 'kind'.

info    Building Component image 'localhost/kubefox/hello-world/frontend:0e74758f06c3d275746689c161eb21e1'.
info    Loading Component image 'localhost/kubefox/hello-world/frontend:0e74758f06c3d275746689c161eb21e1' into kind cluster 'kind'.

info    Waiting for KubeFox Platform 'demo' to be ready...
info    Waiting for Component 'backend' to be ready...
info    Waiting for Component 'frontend' to be ready...

apiVersion: kubefox.xigxog.io/v1alpha1
kind: AppDeployment
metadata:
  creationTimestamp: "1970-01-01T00:00:00Z"
  generation: 2
  labels:
    app.kubernetes.io/name: hello-world
    kubefox.xigxog.io/app-branch: main
    kubefox.xigxog.io/app-commit: 6dcc9937126fccaf119acae8785e3ab90808a998
    kubefox.xigxog.io/app-commit-short: 6dcc993
  name: hello-world-main
  namespace: kubefox-demo
  resourceVersion: "2258944"
  uid: 5ad9a257-01c0-43e0-b6be-92757a47ba7c
details:
  description: A simple App demonstrating the use of KubeFox.
  title: Hello World
spec:
  appName: hello-world
  branch: main
  commit: 6dcc9937126fccaf119acae8785e3ab90808a998
  commitTime: "1970-01-01T00:00:00Z"
  components:
    backend:
      defaultHandler: true
      envVarSchema:
        who:
          required: true
      hash: 3fbfcb274c2116d4d82271da41074135
      type: KubeFox
    frontend:
      dependencies:
        backend:
          type: KubeFox
      hash: 0e74758f06c3d275746689c161eb21e1
      routes:
      - envVarSchema:
          subPath:
            required: true
        id: 0
        rule: Path(`/{{.Vars.subPath}}/hello`)
      type: KubeFox
  containerRegistry: localhost/kubefox
status:
  conditions:
  - lastTransitionTime: "1970-01-01T00:00:00Z"
    message: Component Deployments have minimum required Pods available.
    observedGeneration: 2
    reason: ComponentsAvailable
    status: "True"
    type: Available
  - lastTransitionTime: "1970-01-01T00:00:00Z"
    message: Component Deployments completed successfully.
    observedGeneration: 2
    reason: ComponentsDeployed
    status: "False"
    type: Progressing
Fox didn't rebuild the backend Component as no changes were made. Try testing
out the current v1 Release and latest hello-world-main AppDeployment.
echo -ne "VERSION\tVIRTENV\tOUTPUT" && \
  echo -ne "\nv1\tqa\t"; curl "http://localhost:8080/qa/hello?kf-sample=true" && \
  echo -ne "\nv1\tprod\t"; curl "http://localhost:8080/prod/hello?kf-dep=hello-world-v1&kf-ve=prod&kf-sample=true" && \
  echo -ne "\nmain\tqa\t"; curl "http://localhost:8080/qa/hello?kf-dep=hello-world-main&kf-ve=qa&kf-sample=true" && \
  echo -ne "\nmain\tprod\t"; curl "http://localhost:8080/prod/hello?kf-dep=hello-world-main&kf-ve=prod&kf-sample=true"
echo -ne "VERSION\tVIRTENV\tOUTPUT" && \
  echo -ne "\nv1\tqa\t"; curl "http://localhost:8080/qa/hello" && \
  echo -ne "\nv1\tprod\t"; curl "http://localhost:8080/prod/hello?kf-dep=hello-world-v1&kf-ve=prod" && \
  echo -ne "\nmain\tqa\t"; curl "http://localhost:8080/qa/hello?kf-dep=hello-world-main&kf-ve=qa" && \
  echo -ne "\nmain\tprod\t"; curl "http://localhost:8080/prod/hello?kf-dep=hello-world-main&kf-ve=prod"
Output
What is happening here?
- The first request is going to the
qasubpath and no deployment or Virtual Environment is specified. KubeFox will route the request to the currently-released version of thehello-worldApp in the qa Virtual Environment, which is the hello-world-v1 deployment (AppDeployment to be specific) - our original version. - The second request is routed to the 'prod' subpath and the
hello-world-v1deployment andprodVirtual Environment are specified - so we'll again be accessing v1, our original version. - The third request is routed to the
hello-world-maindeployment in theqaVirtual Environment. When we did theFox Publishabove, we replaced thehello-world-maindeployment with the one we just modified (where we say "Hey" instead of "Hello"). - The last request is the same - it's routed to the (new)
hello-world-maindeployment in theprodVirtual Environment.
Now that you've created a new AppDeployment, take another look at the Pods running on Kubernetes.
Output
NAME                                           READY   STATUS    RESTARTS   AGE
demo-broker-grkcn                              1/1     Running   0          6m11s
demo-httpsrv-7d8d946c57-rlt55                  1/1     Running   0          6m9s
demo-nats-0                                    1/1     Running   0          6m17s
hello-world-backend-3fbfcb2-577868c97b-29q2k   1/1     Running   0          6m1s
hello-world-frontend-0e74758-7c9895669d-mj6vc  1/1     Running   0          18s
hello-world-frontend-98c75bd-65fb98f59d-ll4sf  1/1     Running   0          6m1s
You might be surprised to find only three Component Pods running to support the
two AppDeployments and Release. Remember that KubeFox skipped the build of the
backend component? Because it did not change, the two AppDeployments are able
to share the same backend Pod. This is just one of the ways that KubeFox helps
control provisioning.
KubeFox can achieve this because it dynamically shapes traffic at runtime and will route traffic to the correct
version of the App depending on context. Requests to the v1 deployment - our
original version of the App, will use the initial version of the frontend
component. Requests to the main deployment will use the newly-created version
of the frontend.
Promote
Finally, let's publish the new version of the App, release it to the qa Virtual
Environment, and then promote version v1 to the prod Virtual Environment.
Stricter policies of the prod Virtual Environments require the Release to be
stable. To achieve this, the Operator creates a ReleaseManifest when it
activates the Release. A ReleaseManifest is an immutable snapshot of all
constituents of the Release; the Environment, Virtual Environments, Adapters,
and AppDeployments. This ensures any changes made to these resources after the
Release is activated do not affect the Release.
Release the new version - we'll call it v2 - to qa, and promote the v1
version to prod.
fox publish --version v2 --create-tag && \
  fox release v2 --virtual-env qa && \
  fox release v1 --virtual-env prod
Output
info    Component image 'localhost/kubefox/hello-world/backend:3fbfcb274c2116d4d82271da41074135' exists.
info    Loading Component image 'localhost/kubefox/hello-world/backend:3fbfcb274c2116d4d82271da41074135' into kind cluster 'kind'.

info    Component image 'localhost/kubefox/hello-world/frontend:0e74758f06c3d275746689c161eb21e1' exists.
info    Loading Component image 'localhost/kubefox/hello-world/frontend:0e74758f06c3d275746689c161eb21e1' into kind cluster 'kind'.

info    Creating tag 'v2'.

apiVersion: kubefox.xigxog.io/v1alpha1
kind: AppDeployment
metadata:
  creationTimestamp: "1970-01-01T00:00:00Z"
  finalizers:
  - kubefox.xigxog.io/release-protection
  generation: 1
  labels:
    app.kubernetes.io/name: hello-world
    kubefox.xigxog.io/app-branch: main
    kubefox.xigxog.io/app-commit: 6dcc9937126fccaf119acae8785e3ab90808a998
    kubefox.xigxog.io/app-commit-short: 6dcc993
    kubefox.xigxog.io/app-tag: v2
    kubefox.xigxog.io/app-version: v2
  name: hello-world-v2
  namespace: kubefox-demo
  resourceVersion: "2259758"
  uid: 7d3e6c48-71bd-428f-bd3a-245f73344538
details:
  description: A simple App demonstrating the use of KubeFox.
  title: Hello World
spec:
  appName: hello-world
  branch: main
  commit: 6dcc9937126fccaf119acae8785e3ab90808a998
  commitTime: "1970-01-01T00:00:00Z"
  components:
    backend:
      defaultHandler: true
      envVarSchema:
        who:
          required: true
      hash: 3fbfcb274c2116d4d82271da41074135
      type: KubeFox
    frontend:
      dependencies:
        backend:
          type: KubeFox
      hash: 0e74758f06c3d275746689c161eb21e1
      routes:
      - envVarSchema:
          subPath:
            required: true
        id: 0
        rule: Path(`/{{.Vars.subPath}}/hello`)
      type: KubeFox
  containerRegistry: localhost/kubefox
  tag: v2
  version: v2
status:
  conditions:
  - lastTransitionTime: "1970-01-01T00:00:00Z"
    message: Component Deployments have minimum required Pods available.
    observedGeneration: 1
    reason: ComponentsAvailable
    status: "True"
    type: Available
  - lastTransitionTime: "1970-01-01T00:00:00Z"
    message: Component Deployments completed successfully.
    observedGeneration: 1
    reason: ComponentsDeployed
    status: "False"
    type: Progressing

apiVersion: kubefox.xigxog.io/v1alpha1
kind: VirtualEnvironment
metadata:
  creationTimestamp: "1970-01-01T00:00:00Z"
  finalizers:
  - kubefox.xigxog.io/environment-protection
  generation: 3
  labels:
    kubefox.xigxog.io/environment: qa
  name: qa
  namespace: kubefox-demo
  resourceVersion: "5643"
  uid: f7d7a42f-bc3f-46f3-8ec4-c557e1a84fe3
spec:
  environment: qa
  release:
    apps:
      hello-world:
        appDeployment: hello-world-v2
        version: v2
status:
  activeRelease:
    activationTime: "1970-01-01T00:00:00Z"
    apps:
      hello-world:
        appDeployment: hello-world-v2
        version: v2
    id: 41d473dc-ccff-4878-9daa-abaf2db8d104
    requestTime: "1970-01-01T00:00:00Z"
  conditions:
  - lastTransitionTime: "1970-01-01T00:00:00Z"
    message: Release AppDeployments are available, Routes and Adapters are valid and
      compatible with the VirtualEnv.
    observedGeneration: 3
    reason: ContextAvailable
    status: "True"
    type: ActiveReleaseAvailable
  - lastTransitionTime: "1970-01-01T00:00:00Z"
    message: Release was activated.
    observedGeneration: 3
    reason: ReleaseActivated
    status: "False"
    type: ReleasePending
  releaseHistory:
  - activationTime: "1970-01-01T00:00:00Z"
    apps:
      hello-world:
        appDeployment: hello-world-v1
        version: v1
    archiveReason: Superseded
    archiveTime: "1970-01-01T00:00:00Z"
    id: 011aa5fd-0ed3-4920-8564-bb793435e97c
    requestTime: "1970-01-01T00:00:00Z"

apiVersion: kubefox.xigxog.io/v1alpha1
kind: VirtualEnvironment
metadata:
  creationTimestamp: "1970-01-01T00:00:00Z"
  finalizers:
  - kubefox.xigxog.io/environment-protection
  generation: 2
  labels:
    kubefox.xigxog.io/environment: prod
  name: prod
  namespace: kubefox-demo
  resourceVersion: "5750"
  uid: 4980c5d9-208d-420b-9133-9ff3468eb7e6
spec:
  environment: prod
  release:
    apps:
      hello-world:
        appDeployment: hello-world-v1
        version: v1
status:
  activeRelease:
    activationTime: "1970-01-01T00:00:00Z"
    apps:
      hello-world:
        appDeployment: hello-world-v1
        version: v1
    id: 18875dc4-d347-45be-8221-c0dbc0c1b2e5
    releaseManifest: prod-5747-20240201-162421
    requestTime: "1970-01-01T00:00:00Z"
  conditions:
  - lastTransitionTime: "1970-01-01T00:00:00Z"
    message: Release AppDeployments are available, Routes and Adapters are valid and
      compatible with the VirtualEnv.
    observedGeneration: 2
    reason: ContextAvailable
    status: "True"
    type: ActiveReleaseAvailable
  - lastTransitionTime: "1970-01-01T00:00:00Z"
    message: Release was activated.
    observedGeneration: 2
    reason: ReleaseActivated
    status: "False"
    type: ReleasePending
Note that Fox recognized that the versions of the components composing these
releases were already present on the cluster, so they didn't need to be built or
deployed. We didn't make any
modifications; we're just publishing the new version - v2 - which has our
"Hey" change and releasing it to the qa Virtual Environment, and we're
releasing our v1 (original) version to the prod Virtual
Environment. This mirrors what we'd do in real life - the latest changes
released to QA for additional testing and the stable version to Prod.
Give the new Releases a spin! Notice the new output from the updated frontend
Component in qa, while prod still displays the original output from v1.
With Releases in both Virtual Environments there's no need to manually specify
the context (with the kf-dep and kf-ve query parameters).
echo -ne "VERSION\tVIRTENV\tOUTPUT" && \
  echo -ne "\nv1\tprod\t"; curl "http://localhost:8080/prod/hello?kf-sample=true" && \
  echo -ne "\nv2\tqa\t"; curl "http://localhost:8080/qa/hello?kf-sample=true"
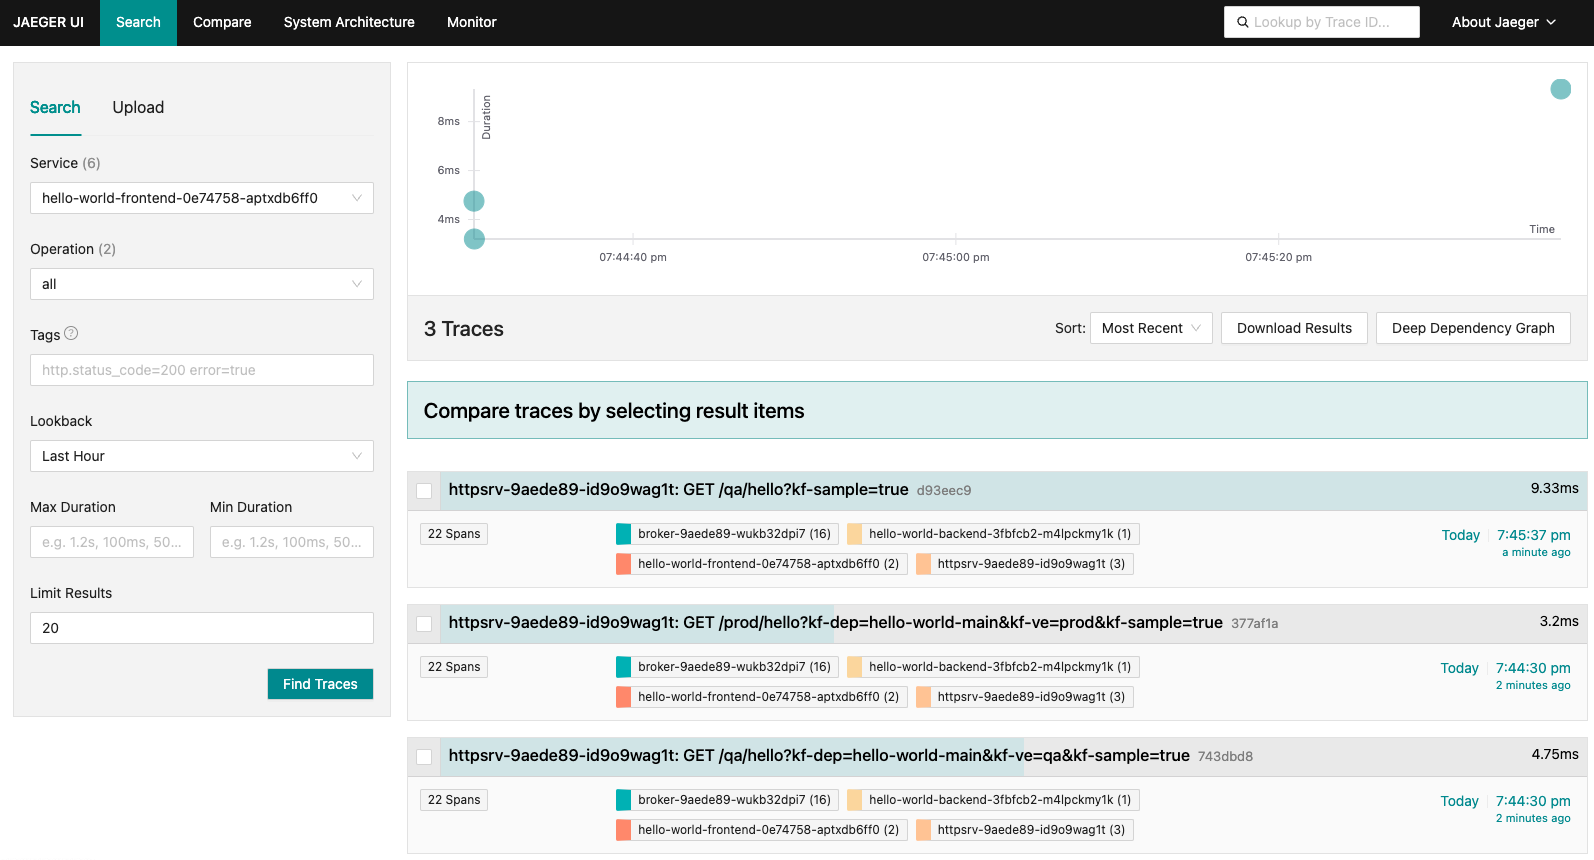
Let's jump over to Jaeger again (remember to refresh the page, select the component and click the 'Find Traces' button). Take a look at the most recent frontend Pod and you'll see 3 traces similar to Figure 3 below:
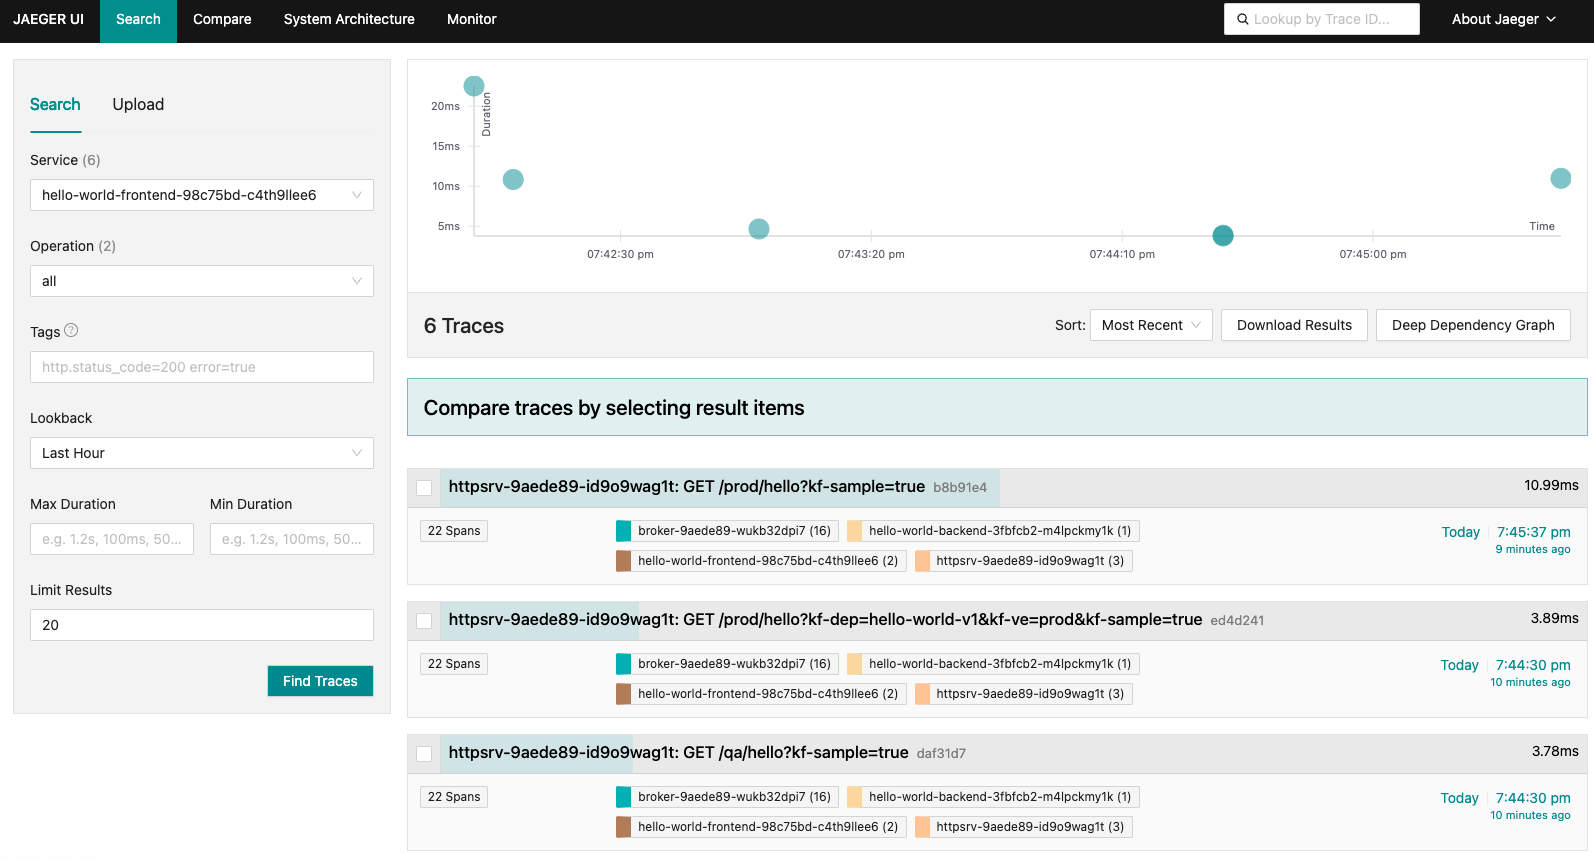
If you look at the other version of the frontend - the original "Hello" version, you'll see that it has 6 traces (Figure 4):
And finally, if you look at the traces for the backend component, you'll see that it has 9 traces (Figure 5):
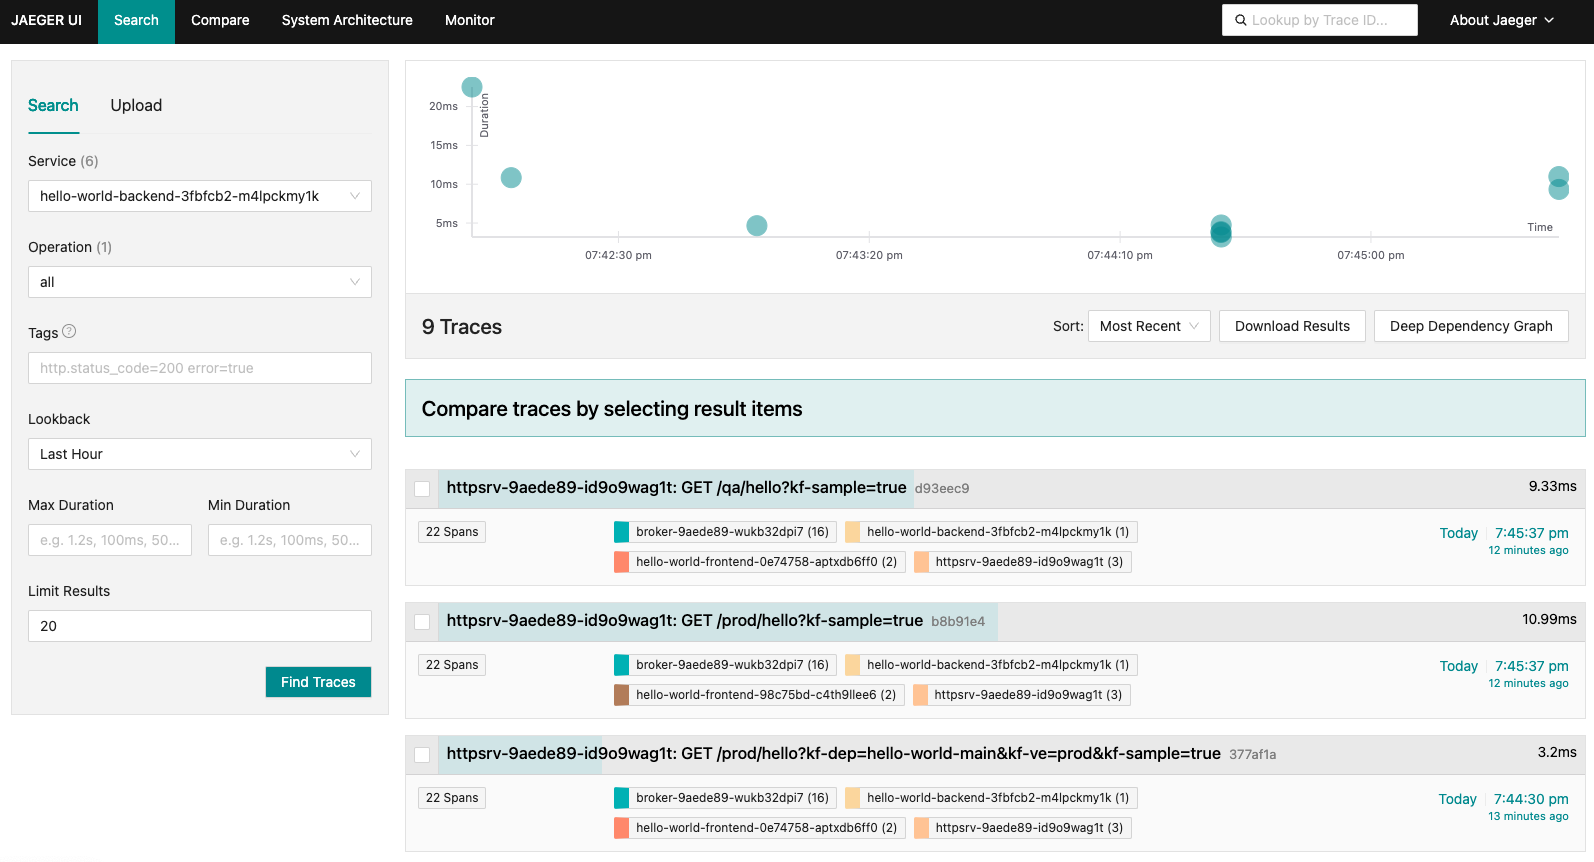
That's because the backend component is handling traffic for both versions of the frontend.
Just for fun take one final look at all that you've created.
kubectl api-resources --output name | \
  grep -e kubefox -e pods | \
  xargs -I % sh -c 'echo; kubectl get --show-kind --ignore-not-found --namespace kubefox-demo %'
Output
NAME                                               READY   STATUS    RESTARTS   AGE
pod/demo-broker-grkcn                              1/1     Running   0          6m21s
pod/demo-httpsrv-7d8d946c57-rlt55                  1/1     Running   0          6m19s
pod/demo-nats-0                                    1/1     Running   0          6m27s
pod/hello-world-backend-3fbfcb2-577868c97b-29q2k   1/1     Running   0          6m11s
pod/hello-world-frontend-0e74758-7c9895669d-mj6vc  1/1     Running   0          28s
pod/hello-world-frontend-98c75bd-65fb98f59d-ll4sf  1/1     Running   0          6m11s

NAME                                                 APP           VERSION   AVAILABLE   REASON                PROGRESSING
appdeployment.kubefox.xigxog.io/hello-world-main     hello-world             True        ComponentsAvailable   False
appdeployment.kubefox.xigxog.io/hello-world-v1       hello-world   v1        True        ComponentsAvailable   False
appdeployment.kubefox.xigxog.io/hello-world-v2       hello-world   v2        True        ComponentsAvailable   False

NAME                                 AGE
environment.kubefox.xigxog.io/prod   54m
environment.kubefox.xigxog.io/qa     54m

NAME                              AVAILABLE   EVENT TIMEOUT   EVENT MAX   LOG LEVEL
platform.kubefox.xigxog.io/demo   True        30              5242880     info

NAME                                                          ID                                     ENVIRONMENT   VIRTUALENVIRONMENT
releasemanifest.kubefox.xigxog.io/prod-5747-20240201-162421   18875dc4-d347-45be-8221-c0dbc0c1b2e5   prod          prod

NAME                                        ENVIRONMENT   MANIFEST                    AVAILABLE   REASON             PENDING   PENDING REASON
virtualenvironment.kubefox.xigxog.io/prod   prod          prod-5747-20240201-162421   True        ContextAvailable   False     ReleaseActivated
virtualenvironment.kubefox.xigxog.io/qa     qa                                        True        ContextAvailable   False     ReleaseActivated
Cleanup
Once you are done with the quickstart, you can delete the Kubernetes cluster and related resources created during the setup.
Explore the rest of the documentation for more details. If you encounter any problems please let us know on GitHub Issues.